
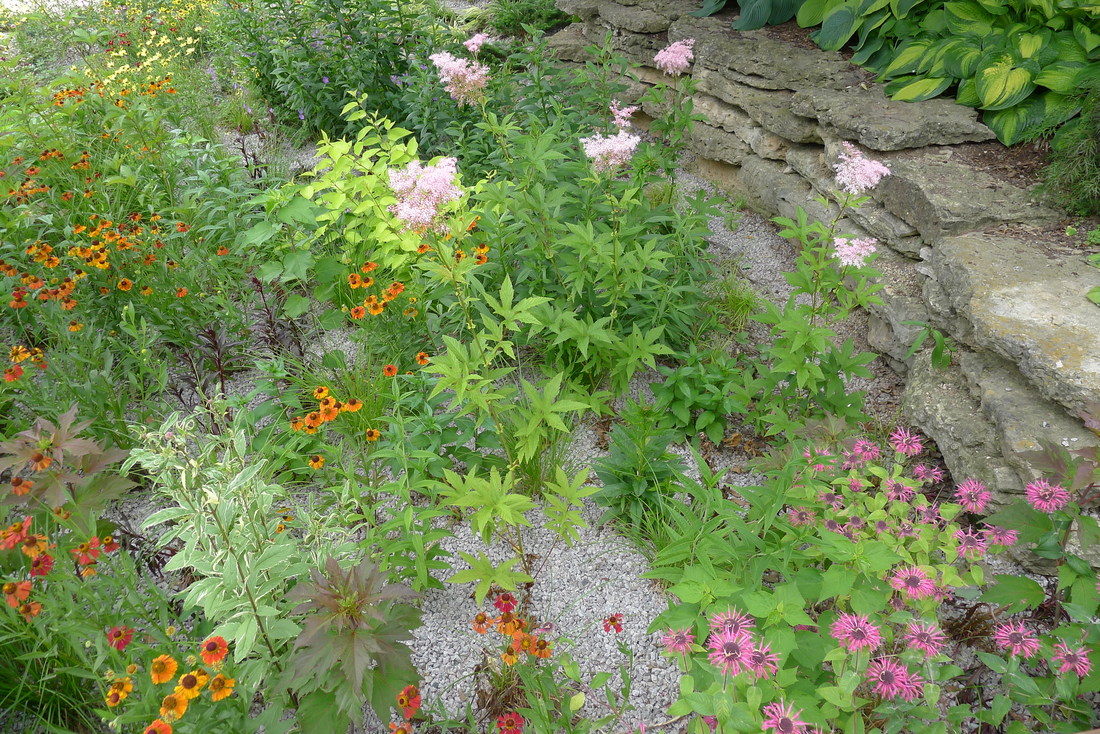
 A rain garden is a garden of native plants that are planted in a small depression or slope. It is designed to temporarily hold and soak in rain water runoff that flows from roofs, driveways, patios or lawns. What are rain gardens supposed to do?During a rain storm, rain water will gush out of the gutters and downspouts, across lawns that have been treated with fertilizers and into a storm drain that then dumps it into local rivers and lakes. Rain gardens capture and filter this rainwater, nurturing native plants and creating a beautiful habitat for native species of insects. How do I plant a rain garden?1. Location, Location, Location
2. Measure Drainage Area (Optional)If you are building the rain garden in a low spot in your yard, it is not necessary to measure the drainage area. Just ensure the area receives water regularly during a rainstorm. However, if you are capturing water from a roof or other hard surface you will need to measure the specific drainage area of that surface and multiply by the number associated with the type of soil you have. For sandy soil multiply by 20%, for loam use 30-35% and for clay use 45-60%. This is a bit of an overestimate but it will ensure that your plants get enough water. 3. It's time to choose your plants!Native plants are highly recommended for use in rain gardens because they are well-adapted to the environment and have very deep roots for absorbing water. You will want to choose plants (flowers, grasses and sedges) that will grow well in both wet and dry areas because the rain garden will temporarily fill with rainwater from time to time. 4. Create a DesignReady for the fun part? It is helpful to plan your garden on paper first so that you can create the best rain garden possible. A garden plan can be created simply using a pen and paper or an online garden planning program. 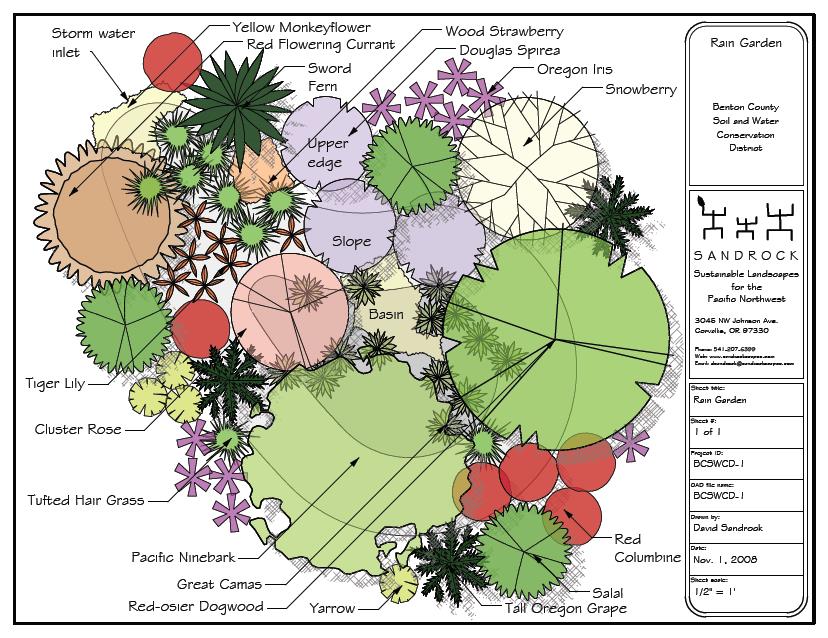 5. Create a Layout of the GardenLay out the shape and boundary of the garden based on your design. I like to plan by "zones" or small microclimates. For instance, Zone 1- lowest, wettest part Zone 2- medium-dry, will occasionally get wet Zone 3- highest, driest part of the garden. When searching for plants, match their optimal growing conditions with the appropriate zone in your garden. 6. Start digging!Remove the turf grass and dig your garden approximately 4-8 inches deep. Make sure you create a gentle slope so that you have clear microclimates and to not erode the soil. Use the soil to build a berm around the garden edges so overflow is minimal. 7. Prepare the SoilAmend the soil with about 2" of compost and you can also mix in other organic amendments such as alfalfa meal, bone meal, fish meal ect. Mix in well to provide extra nutrients for your plants. 8. Planting!Follow the design you created and place your plants in the approximate positions before planting. Step back and look at the garden and the design. Plants should be placed about 1 foot apart from each other. Once you are satisfied you can start planting the flowers and grasses using a hand trowel. 9. Mulch the GardenUse coarse, fibrous, shredded wood chips that won’t float or blow away. Apply the mulch about 2-3 inches deep. This will help to keep the moisture in and the weeds out. 10. Arrange the Water SourcesAfter you have planted the garden, water every other day for 2 weeks if there isn't rain in the forecast. Keep an eye on your rain garden while it is still establishing itself. Once the plants seem to have established good root systems and are growing bigger, you can slowly decrease how much time you spend maintaining it.
7 Comments
5/11/2021 09:33:02 pm
I simply wanted to write down a quick word to say thanks to you for those wonderful tips and hints you are showing on this site. 8/29/2021 02:36:24 am
thank you so much for your hard working.keep it up. 7/13/2022 03:41:48 am
A properly positioned rain garden filters contaminants transported by stormwater runoff and decreases runoff, flooding, and runoff. In addition to the advantages for the community and the preservation of a priceless natural resource, rain gardens make great habitat for birds and butterflies. 7/13/2022 03:42:36 am
Rain gardens are made to drain in less than 24 to 48 hours, which isn't long enough to make an ideal environment for mosquito breeding. In locations with greater soil drainage, rain gardens will drain even more quickly—down to 12 hours. Leave a Reply. |
AuthorRebecca Chandler 
Archives
March 2024
Categories |
 RSS Feed